Retrofit: A Solution for the Stacked Brick Door
As the bricks wore down, an increasingly large amount of heat was lost through the growing gaps in the kiln door. Rebuilding the door twice a year was a costly undertaking. The continual sifting and dropping of refractory particles on the front section of glazed ware produced an unacceptable number of seconds. The job had become a mental and physical obstacle in that the time and energy involved in it hindered the efficient movement of pottery through the studio. Our work cycle is based on a full 100-cubic ft. load of glazed pottery each week. Clearly, the most viable solution was a lightweight fiber door encased in a steel shell, supported by a mechanical hinge of some design.
The first step for us, then, was to research the fiber market. We contacted the major manufacturers and were provided with up-to-date product information and prices. It appeared that there were two current forms of installation. The first involved using fiber blanket impaled on stainless steel studs that were welded to the steel shell. Layer upon layer of ceramic fiber and related insulating materials gave the shell an appropriate thickness. The second form of installation utilized fiber modules folded sections of fiber that were cemented to their own backing plate of expanded metal. These were anchored to the steel shell by means of a self-tapping screw, drilled from the fiber side. Hence, no exposed anchoring devices would be on the hot face.
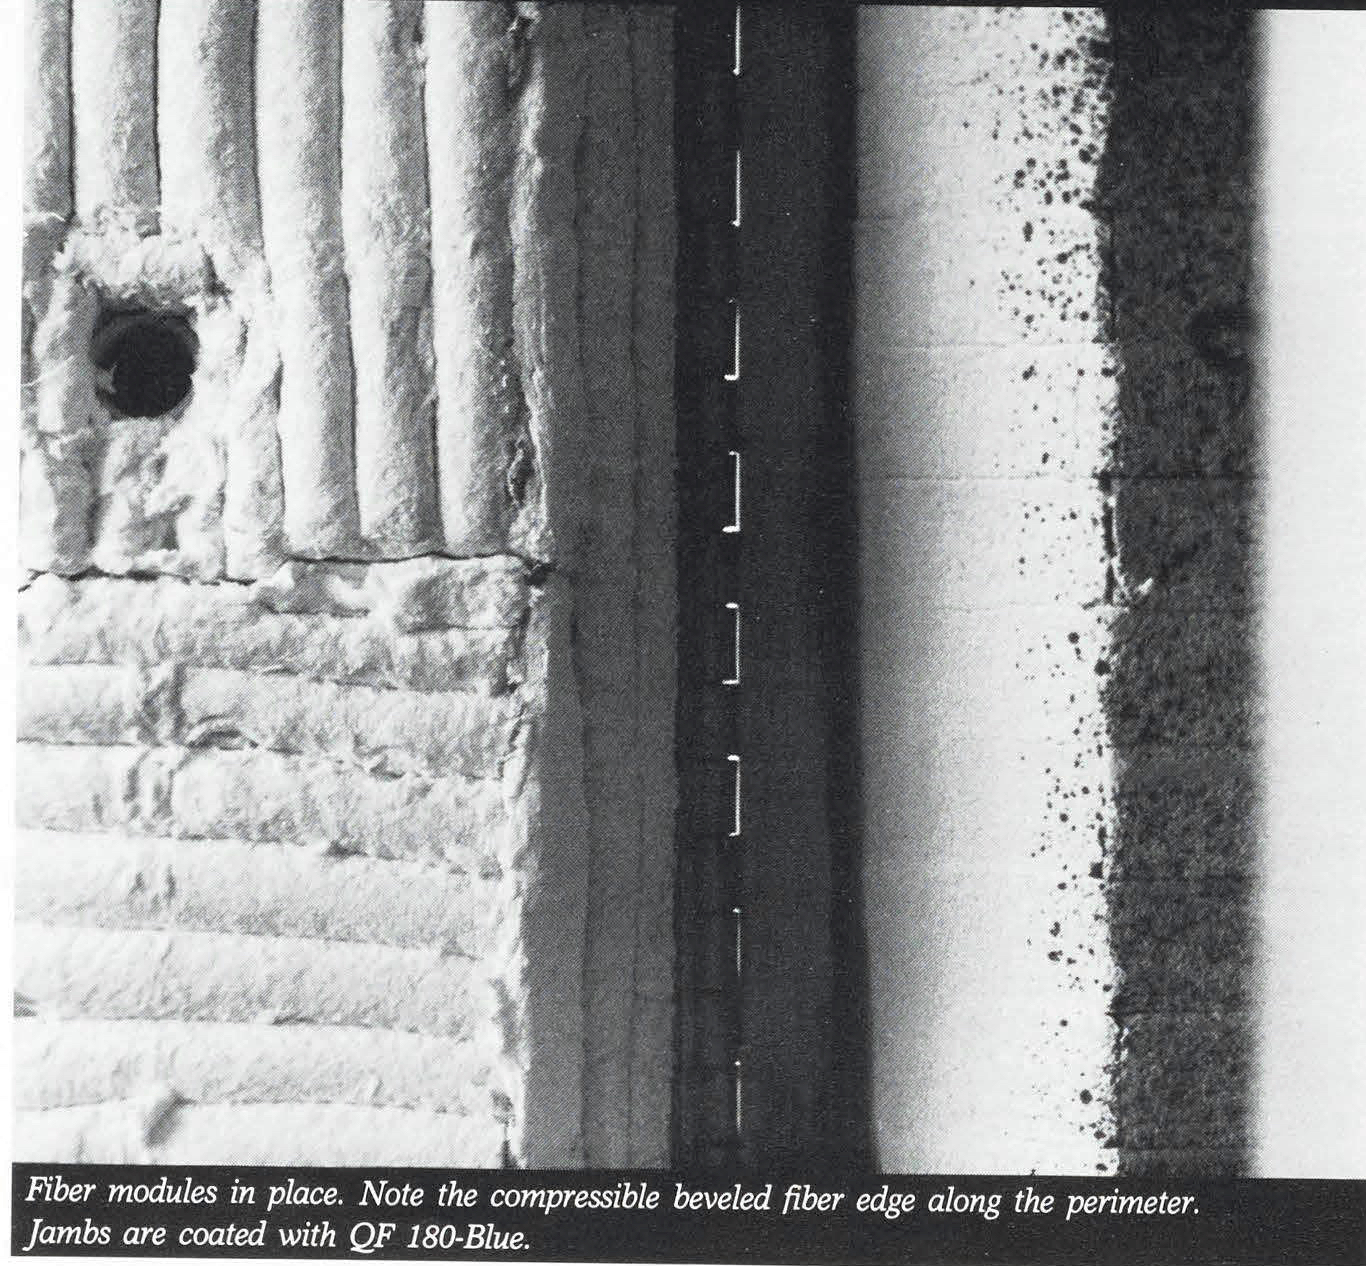
We opted for the second form of installation and selected Carborundum's Anchored 2600 degree modules sized 12"xl2"x6". These appeared to be easy to install, had minimal linear shrinkage, and provided a high degree of insulation per inch of thickness. We also purchased a roll of Dura-Blanket H 2600 degree fiber, 10-pound density, Fiberstick adhesive, and QF 180-Blue cement coating. All were available from a local supplier.
The steel shell was fabricated out of 11-gauge sheet metal at a local industrial metal shop. Two-inch diameter holes were pre-punched for spyholes, and the necessary welding and finish grinding were completed at the shop.
We provided the builders with complete scaled drawings and templates of the arch curve, so that the steel shell would be an oversized duplicate of the existing door opening. The hinge was a 6-foot-long, 5-inch-open, 3/4" diameter pin continuous strip hinge purchased from an industrial supply house. Locking devices were fabricated on site using threaded rod and commercial aluminum hand knobs.
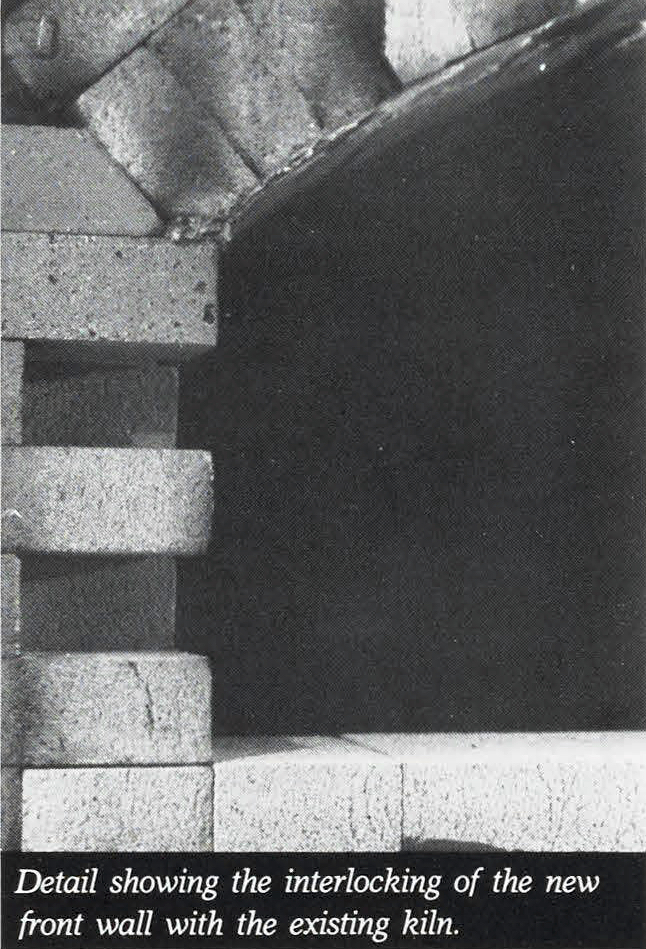
The next step for us was to tear down the existing front of the kiln and rebuild the wall with new tapered jambs that would allow the door to swing, with full clearance for the fiber.
Templates were made from masonite, corresponding to the correct angle, and each brick was then cut and custom fit. The entire wall was mortared with a fireclay sodium silicate cement mixture and checked for level and plumb at each finished course. The existing face of the arch was chamfered at a slight angle to allow better sealing of the fiber at that point. After completion, the jambs and arch face were given two coats of QF 180-Blue cement sealer to minimize the wear and tear on the fiber seal.
 The door and hinge were set in place, clamped to the existing steel and checked for proper alignment, clearance, and swing. The shell was set slightly back from the brick surface of the kiln wall, to allow for a slight overhang of fiber that would form a compressive seal along the entire perimeter of the door. After being tackwelded in place, the door, hinge, and channel assembly were removed from the kiln and laid flat, and the final welding and finish grinding were completed.
The fibering system was designed to allow the perimeter to compress and form a seal. The locking system was designed to put the entire door under compression at the jamb surface only. This would provide for a proper seal along the entire perimeter of the new door. Once this appeared to function properly, the raw steel was given two coats of high temperature, rust inhibitive paint both inside and out.
The fiber modules were designed to be compressed as they were installed, thus minimizing the shrinkage between the folds in the modules as well as between the modules themselves. We decided to use a parquet system of fibering that would further reduce possible voids and shrinkage. The first step was to fabricate on site module strips for the perimeter seal. Long strips of Dura- Blanket H 2600 were cut, folded, cemented together with Fiberstick adhesive, and stuck to the steel shell.
Four layers of folded strips were built up at increasing heights, relative to the center of the door, to match the newly cut angle of the insulating brick jambs.
The arch and floor areas were fibered in this manner also. As the final thickness of the fiber was to be 6 inches, the design of the steel shell allowed for an overhang of fiber to compress against the insulating brick for a seal.
After the perimeter was complete, the modules were anchored in place with the self-tapping screws. My assistant compressed the module, held it in place, and I screwed it fast. The 12"xl2" modules fit perfectly, and small modules were fabricated on site for the center section of the door. These were glued together and compressed into their corresponding places following the parquet pattern. All voids were filled with fiber in this manner, and the result was a densely packed wall of ceramic fiber.
A few weeks prior to the installation of the new door, we fabricated peephole liners out of a high temperature kaolin body. A slab flange was added, and the liners were fired in our glaze kiln to cone 10. The fiber and expanded metal that covered the punched holes were cut away, and the fired clay liners were glued in place.
To make sure the seal aligned perfectly, I went into the kiln and had the door sealed from the outside. With a strong flashlight it was possible to see where there were gaps in the fiber and jamb areas. These sections were marked, and additional fiber was glued in place.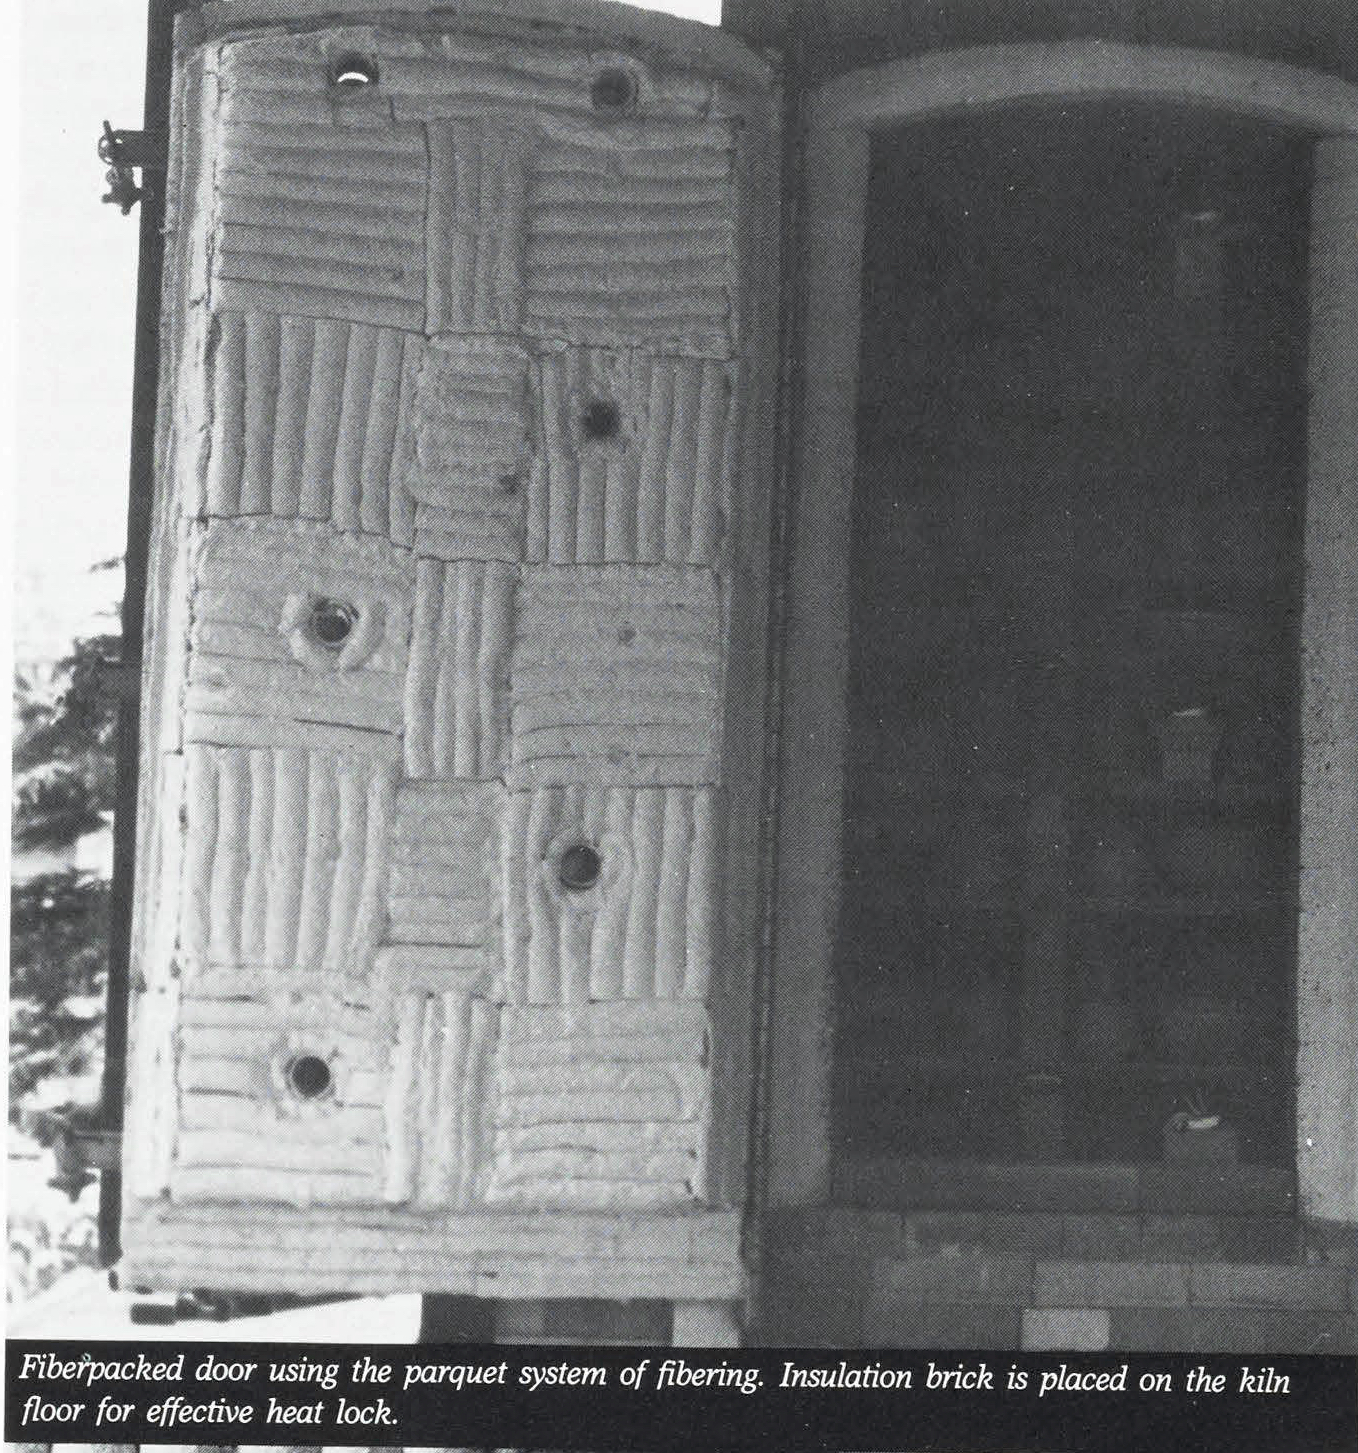
The final installation was to gently press the few ragged edges of fiber back into place. The drilling of the selftapping screws tended to tear and abrade small sections of fiber material from the modules. Once the edges were pressed back into place, the modules resumed their original appearance and no loose pieces of fiber could work loose and fall into the kiln. The exposed ends of the self-tapping screws were knocked off with a chisel and filed flush with the outside surface of the door. Since all fiber products shrink during use, the small gaps that open after each firing are packed with small pieces of fiber as necessary.
This retrofit was by no means an inexpensive endeavor, but in terms of saving time and labor, and decreasing energy loss through the door, it has paid for itself many times over. There is no air infiltration in the front section, no refractory crumbs dropping on glazed ware, and no bricks to stack, restack, and eventually replace.